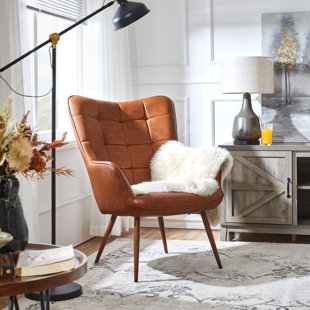
Bring mid-century style to any seating ensemble with this distinctive accent chair. Founded on a solid oak wood frame, this chair is defined by an iconic silhouette with a dramatic wingback, flared arms, and tapered dowel legs in an espresso finish. Enveloped in a synthetic velvet upholstery, the chair features button tufting and detail stitching for a tailored touch, while it's sinuous springs suspension and foam cushioning provides a supportive and approachable aesthetic.
- Frame Material: Solid Wood
- Level of Assembly: Partial Assembly
- Weight Capacity: 250lb.
I think this is absolute GEM for under $200/chair! Holy cow! Received about an hour ago. I took pics as I assembled, so I could help those who are less "handy" :) First off, the packaging was spectacular. The chair fit perfectly into the box (as shown) and the chair itself came in a dust bag (which I'm going to save for who knows what) to protect it from any box or traveling dust. Color me impressed! It took me less than 10 minutes total to assemble each, including snapping pics (not including photo editing time! ha!). There are a couple wrinkles, but I think they'll fade with time and use and seriously, if you want perfection, please pay $700 or more. I bought the light gray, and it is really a silver, as I expected (my kids are old enough to buy new ones if they drop a popsicle on them!!). The cushioning is firm, which I really like because our older guests need more firmness so they can get up easier. Chairs are very sturdy, no wobbling, and the fabric is soooo soft! I'm perfectly happy! So here are my little tips during assembly:
1. Only open the box where you see tape, you'll avoid frustration. Then lay box down on tall end and pull chair out so that it's laying on it's back, perpendicular to how it will sit normally. PRO TIP: assemble first, leaving bag on chair, then lean upright to remove it so that you aren't getting your new velvet chair dirty from your floors. Don't judge me for having dirt on my floors I had contractors in today!
2. The black mesh on the bottom has 3 sides of Velcro. Unstick these sides and put the flap over the top (seat) of the chair so you can work. DO NOT RIP THIS OFF! Your legs are inside.
3. Short go to the back of the chair, taller ones in front. Do one leg at a time, put the first bolt in (with washers of course), but only far enough to hold while you put in the 2nd in, then you can tighten. If you tighten the first before inserting the 2nd, you won't be able to get the 2nd to line up.
4. Pull your black mesh back down and secure the velcro.
5. Pour a glass of wine (this step is optional... sort of), sit in your new fancy chairs and judge the neighbors' décor.. Lee. Pittsburgh, PA. 2017-11-30 16:24:04